If you use text files to store and manage data, you’ve probably faced the challenge of converting these files into CSV, XLSX, or other Excel-compatible formats.
Excel is a powerful tool for automation, data analysis, modeling, reporting, and more. It can even handle large amounts of data efficiently.
However, you must first bring your data into Excel to make the most of these capabilities. Copying and pasting the data manually from a TXT file to Excel is not feasible.
The data might end up pasted in a single column or the wrong cells, and it can be time-consuming, especially with larger files. Plus, you risk losing or misplacing important information.
This article will cover how to convert text to Excel using online and offline tools and methods.
Also read: How to convert Word to Excel?
Here’s a quick overview of the different methods:
| Method | Best Suited For | Pros | Cons |
|---|---|---|---|
| 1. Open in Excel | Small, simple files | Fast, easy | Limited control |
| 2. Copy-paste | Small, structured data | Simple, quick | Manual process |
| 3. ‘Get Data’ | Large, complex files | Handles large data | Excel 2016+ only |
| 4. Online tools | Small to medium files | Easy, no software | Privacy concerns |
| 5. VBA macros | Batch processing | Automates tasks | Requires coding |
| 6. Python | Large, complex data | Powerful, flexible | Requires coding |
| 7. LLMs | Unstructured data | Easy, AI-powered | Inconsistent output |
| 8. IDP | Structured data extraction | Accurate, consistent | Setup, training |
1. Open the text file using Excel
Import text to Excel by opening the text file directly in Excel.
This is a straightforward method to convert text to Excel. No additional software or online tools are required.

Just follow the steps below:
- Open Excel and select the ‘File’ option from the menu
- Click on ‘Open’ and navigate to the location of your file
- Select ‘All Files (*.*)’ from the drop-down menu in the lower right corner
- Locate and select your text file, then click ‘Open’ (Note that Excel can handle various text file formats, including .txt, .csv (comma-separated values), and .tsv (tab-separated values))
- Excel’s Text Import Wizard will appear — specify how Excel should interpret the data in your text file
- Choose the appropriate Delimiter (comma, tab, or other) that separates your data
- Preview your data and adjust any settings as needed, then click ‘Finish’. (Use Excel’s formatting options to correct data formatting errors with dates or numbers)
- Your text data will now appear in an Excel spreadsheet
Note: The delimiter is the character that separates your data fields. Common delimiters include commas (,), semicolons (;), and tabs. Choosing the correct delimiter is crucial to ensure your data is imported correctly into Excel.
While this method is fast and simple, it may struggle with poorly formatted content, data containing a mix of numbers, text, and dates, or usage of non-standard delimiters. Excel may not parse and interpret such files correctly, resulting in inconsistencies.
Best suited for: Importing data from sources like exported reports, log files, or simple data backups.
2. Copy-paste the tables from Notepad to Excel
Another simple way to convert text to Excel is to copy the data from a text editor like Notepad and paste it into an Excel worksheet. Excel’s Text Import Wizard lets you easily copy and paste tabular data from text files while maintaining the structure.
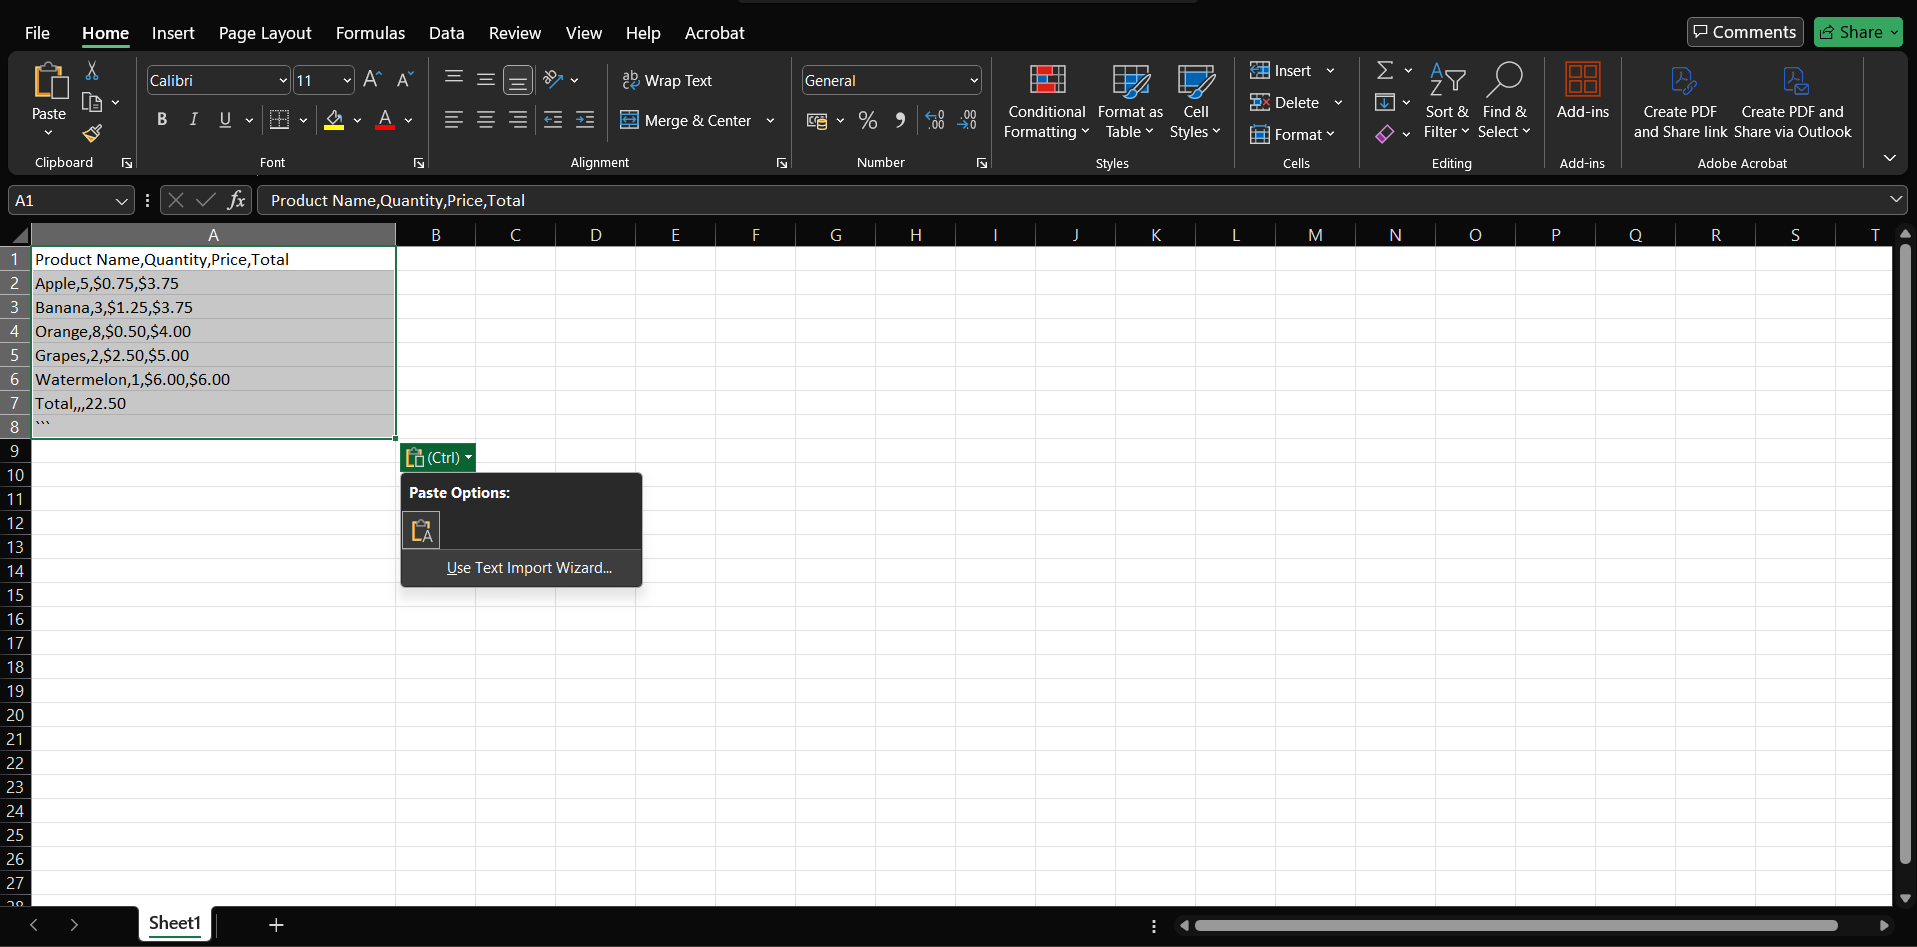
To copy a text table from Notepad to Excel using the Text Import Wizard:
- Open the text file in Notepad or any other text editor
- Select and copy the tabular data you want to convert
- Keep a note of how the values are separated (comma, tab, space, etc.) — the delimiter used
- Open a new Excel workbook and select the cell where you want to paste the table
- Paste and Select the Contents. Once selected go to Data -> Text to Columns.
- The Text to Columns dialog box will open — select ‘Delimited‘ and click ‘Next’
- Select the delimiter used in your text file (comma, tab, space, etc.) and click ‘Next’
- Specify the data format for each column or use the default ‘General’ format
- Click ‘Finish’, and the copied data will appear in the Excel worksheet, maintaining the original tabular structure.

This method works well for small tables, but the data must be cleanly formatted, with proper delimiters and no missing or extra values. The output Excel table may not be structured correctly if it contains inconsistencies or irregular formatting. Also, it is not ideal for large datasets because you have to manually copy and paste data, which can be time-consuming and prone to errors.
💡
Pro tip: Text tables may not be visually appealing when imported into Excel. Excel’s ‘Quick Analysis’ tool, accessible by selecting the table data, provides instant access to various formatting, charting, and analytical features.
Best suited for: Transferring data from simple lists or tables with a limited number of rows and columns like inventory records and customer lists.
3. Use Excel’s ‘Get Data’ Feature
Excel’s ‘Get Data’ feature is more efficient for importing and converting text to Excel. This feature supports a variety of data sources, including text files.
Using Excel’s Get Data Feature
Here are the steps to follow:
- Open Excel and select the ‘Data’ tab from the menu bar
- Click on the ‘Get Data’ option and navigate to ‘From Text/CSV’
- Locate and select your text file, then click ‘Import’
- Excel will preview your data — choose the appropriate delimiter, file origin, and data type detection setting, then click ‘Load‘
- Get the text data in an Excel window, ready for further analysis and reporting
However, Get Data may misinterpret fields like string dates due to inconsistent formats, zeros, or regional settings, leading to incorrect data imports or conversion errors. So, the data may require some pre-processing before conversion.
💡
Pro tip: If your text file contains duplicate entries, Excel can easily identify and remove them, giving you a cleaned-up dataset to work with. The “Remove Duplicates” feature is available in the ‘Data’ tab.
It is important to note that the ‘Get Data’ feature is only available in more recent versions of Excel (2016 and later). If you’re using an older version, you may need to upgrade or try a different method.
Best suited for: Importing data from sales reports, transaction logs, bank statements or inventory reports, and log files from web servers or applications.
4. Convert Text to Excel with online convertors
These online converters can provide output in various Excel-compatible formats, such as CSV, XLS, and XLSX, in a matter of clicks. No technical expertise or software installation is required.
Some of the popular online converters include:
These tools are straightforward to use. Generally, you need to:
- Go to the converter’s website
- Upload your text file
- Select the desired output format (e.g., CSV, XLS, or XLSX)
- Click ‘Convert’ or a similar command
- Download the converted file and open it in Excel for further use
💡
Pro tip: Use TRIM, CLEAN, and SUBSTITUTE functions to clean up and standardize your text data by removing extra spaces and non-printable characters or replacing specific characters or strings.
While online converters are handy, they may not be the best choice for sensitive or confidential data. As these tools require you to upload and process your files on third-party servers, there is a risk that they may not adhere to data privacy and security standards. Plus, some tools may have constraints on file sizes and lack customization options.
Best suited for: Converting small to medium-sized text files (up to a few thousand rows) with simple, consistent structures containing contact lists, product catalogs, or survey responses.
5. Batch processing multiple text files using VBA
If you have multiple text files that you need to convert to Excel format, manually opening and importing each file can be time-consuming. Fortunately, Excel offers a way to automate this process using VBA (Visual Basic for Applications) scripts.
By creating a VBA macro, you can loop through all the text files in a specified folder and import the data from each file into a new worksheet within your active Excel workbook. This automation can significantly speed up your workflow when dealing with multiple text files.
To create a VBA macro for batch processing text files, you’ll need to:
- Open the Visual Basic Editor in Excel (press Alt+F11)
- Create a new module and write a VBA script that does the following:
- Specifies the folder path where your text files are located
- Loops through each text file in the folder
- Creates a new worksheet for each file and sets the worksheet name based on the file name
- Imports the data from each text file into the corresponding worksheet
- Run the macro (Press Alt + F8) to import all the text files into your Excel workbook automatically
Sub ImportTextFileToExcel()
    Dim FilePath As String
    Dim FileNum As Integer
    Dim FileContent As String
    Dim LineItems() As String
    Dim RowNumber As Long
    Dim ColNumber As Integer
    Dim Delimiter As String

    ' Set the file path
    FilePath = "C:\path\to\your\file.txt"  ' Update this to the path of your text file

    ' Set the delimiter (e.g., "," for CSV, "|" for pipe-separated, vbTab for tab-separated)
    Delimiter = "|"

    ' Open the file
    FileNum = FreeFile
    Open FilePath For Input As FileNum

    ' Start reading the file line by line
    RowNumber = 1
    Do While Not EOF(FileNum)
        Line Input #FileNum, FileContent  ' Read a line from the file
        LineItems = Split(FileContent, Delimiter)  ' Split the line into items based on the delimiter

        ' Write the items to the worksheet
        For ColNumber = LBound(LineItems) To UBound(LineItems)
            Cells(RowNumber, ColNumber + 1).Value = Trim(LineItems(ColNumber))
        Next ColNumber

        ' Move to the next row in the worksheet
        RowNumber = RowNumber + 1
    Loop

    ' Close the file
    Close FileNum

    ' Notify the user
    MsgBox "Text file has been successfully imported to Excel!", vbInformation
End Sub
VBA helps you automate the conversion process and allows you to tailor the import process to specific needs, such as defining how data is parsed and formatted. However, it has a steep learning curve for those unfamiliar with programming or its specific syntax, making it difficult for novice users to create and maintain macros. You may not want to spend time and effort debugging and troubleshooting complex macros, especially with their limited error handling and reporting capabilities.
Best suited for: Automating repetitive imports of a large number of text files, such as daily sales reports, inventory updates, or log files generated by internal systems.
6. Convert text to Excel using Python libraries
If you’re comfortable with coding and prefer a more programmatic approach to converting text files to Excel, Python offers several powerful libraries that can help you automate the process. One of the most popular and versatile libraries for this task is pandas.
Using pandas, you can easily read text files into a DataFrame, a two-dimensional data structure similar to an Excel spreadsheet. The library supports various text file formats, such as CSV (comma-separated values), TSV (tab-separated values), and fixed-width files. Once your data is in a DataFrame, you can perform a wide range of data cleaning, manipulation, and analysis tasks using pandas‘ built-in functions and methods.
pip install pandas openpyxl
To convert a text file to Excel using pandas, you must first install the library and its dependencies (openpyxl for Excel support). Then, you can use functions like read_csv() or read_fwf() to load your text file into a DataFrame, specifying the appropriate delimiter or column widths. If needed, you can clean and transform your data within the DataFrame, such as renaming columns, filtering rows, or converting data types.
Finally, you can export the DataFrame to an Excel file using the to_excel() function. You can specify the output file name, sheet name, and other options like writing to multiple sheets or using an ExcelWriter for more control over the output.
import pandas as pd

# Load the text file into a DataFrame
df = pd.read_csv('yourfile.txt', delimiter="|")

# Clean and manipulate the data (optional)
df.columns = ['Product Name', 'Quantity', 'Price', 'Total']
df['Quantity'] = df['Quantity'].astype(int)
df['Price'] = df['Price'].astype(float)
df['Total'] = df['Total'].astype(float)

# Export the DataFrame to Excel
df.to_excel('output.xlsx', index=False)
print("Data successfully converted and saved to output.xlsx")
Python offers greater flexibility, customization, and automation than manual methods. However, the greater computing requirements and steep learning curve of Python syntax and data manipulation libraries can slow down non-programmers. You may also have to deal with compatibility issues between different versions of Python or dependencies, which can lead to script failures or unexpected behavior.
Best suited for: Handling large, complex, or unstructured text files, such as web server logs, social media data exports, or scientific data with millions of records.
To avoid writing scripts to automate the extraction process, you can leverage the power of Large Language Models (LLMs) like ChatGPT and Claude to convert your text files to Excel format. LLMs can understand and process natural language, making them capable of handling structured and unstructured data.
For simple text-to-Excel conversions, you can directly use an LLM like ChatGPT.
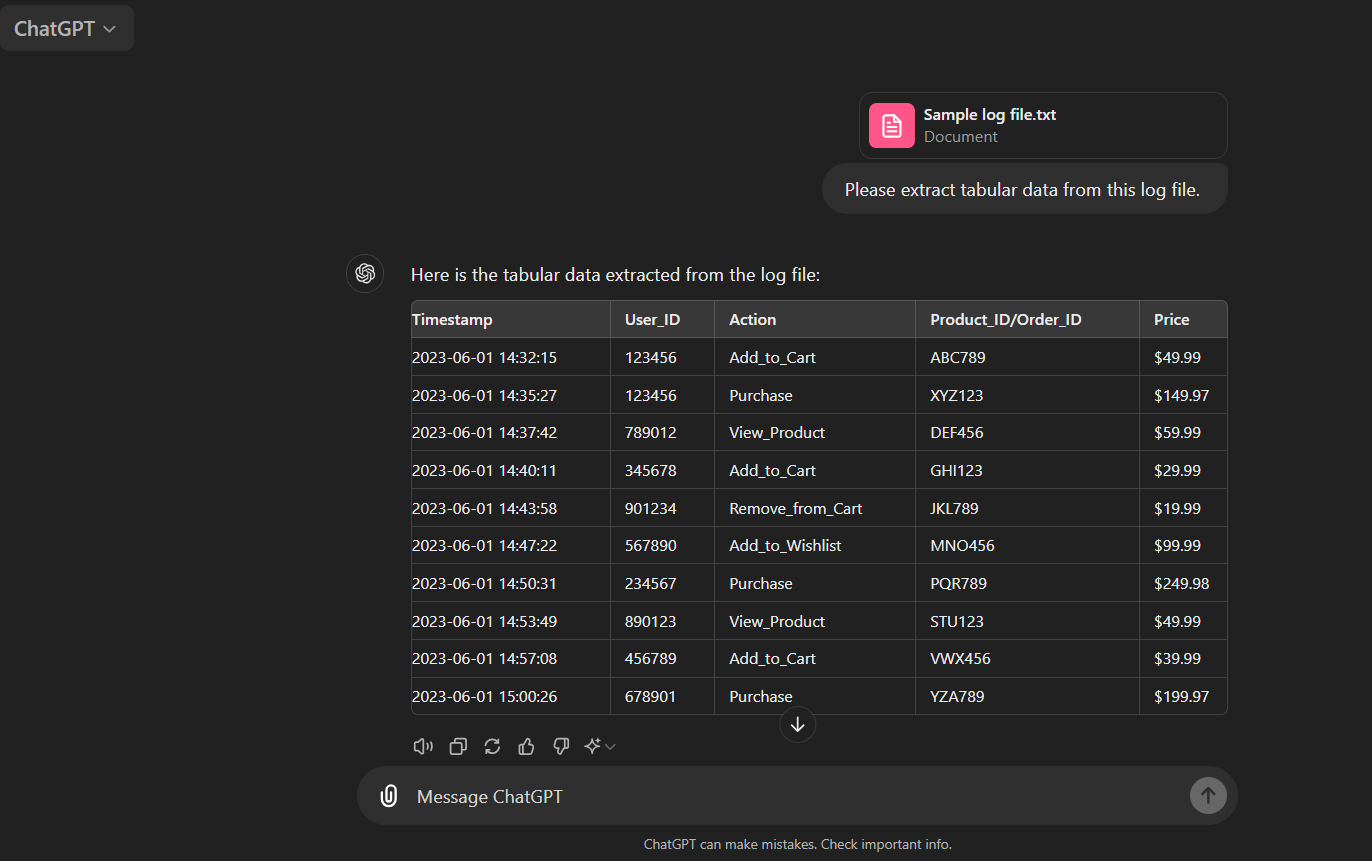
Here’s how:
- Upload the text file(s) to ChatGPT.
- Provide ChatGPT with clear instructions on converting the text data into a structured format suitable for Excel. For example: “Please convert the following text data into a comma-separated format suitable for Excel”.
- The LLM will generate a structured output based on your prompt. Review the output and make any necessary adjustments to ensure it aligns with your desired Excel format.
- You can copy-paste the structured output into Excel and specify the delimiter or request ChatGPT to generate a downloadable Excel file.
Now if you wish to fully automate the workflow, you can do so by creating Zapier zaps that integrate with ChatGPT and your preferred cloud storage service. Here’s how:
- Choose a trigger event in Zapier based on where your text files are stored (e.g., Google Drive, Dropbox, or email).
- Use the ChatGPT action in Zapier to send the text file content to the LLM for processing. Provide a clear prompt instructing ChatGPT to convert the data into a structured format.
- ChatGPT will generate a structured output based on your prompt. Zapier will automatically pass this output to the next action in your workflow.
- Use a Zapier action to send the structured data to Excel. This can be done by creating a new row in Google Sheets or saving the data as a CSV file in a cloud storage service like Dropbox.
Using LLMs like ChatGPT or Claude can significantly reduce the time and effort required for text-to-Excel conversions. These AI models can understand the context and structure of your data, making the process more efficient and accurate compared to traditional methods.
However, these AI models may occasionally generate inaccurate or inconsistent output. Hallucination is a common issue with generative models, where the AI may confidently present false information as fact. Additionally, the cost of using LLMs can add up quickly for larger volumes of data.
Best suited for: Extract specific data points from small to medium-sized unstructured or semi-structured text data datasets, such as customer reviews or social media posts. They are ideal for exploratory analysis, prototyping, or situations where non-technical users need to perform ad-hoc conversions.
While LLMs and Zapier provide a powerful combination for automating text-to-Excel conversion, sometimes you need more advanced capabilities to extract structured data from complex documents. Because LLMs don’t have a built-in understanding of your specific data extraction requirements, their accuracy depends on the kind of prompts you give.
Here’s a quick glimpse into how an IDP can help you extract data from legal documents
This is not ideal when you have to process a large volume of documents with varying formats and structures. Crafting the perfect prompt for each document type can be challenging. This is where specialized Intelligent Document Processing platforms like Nanonets come in handy.
These tools use AI models that are trained to understand the structure and layout of different types of documents, so they can accurately locate and extract the data you need without relying on complex prompts. This saves you time and effort and ensures more consistent and reliable results, even for challenging documents.
For the purpose of this article, let’s consider log files from a large e-commerce website as an example. These log files can be massive, containing millions of lines of text data, with each line representing a user action or system event.

Now imagine you have millions of lines like this, and you need to extract specific data points (like User_ID, Action, Product_ID, and Price) and convert them into a structured Excel format for further analysis.
Here’s how you can use a tool like Nanonets to efficiently process these large, complex log files:
- Upload your log files to Nanonets or connect them to your cloud storage service where the files are stored.
- Train the AI model by annotating a few sample lines, highlighting the data points you want to extract (User_ID, Action, Product_ID, Price).
- Configure the workflow to automatically process incoming log files, specifying the file format, data fields to extract, and any validation or transformation rules needed.
- Let Nanonets extract the specified data fields from your log files, converting the semi-structured text data into a structured format ready for export.
- Validate the extracted data against predefined rules or send it for human review if needed.
- Export the extracted and validated data to an Excel file, using Nanonets’ various export options and integrations.
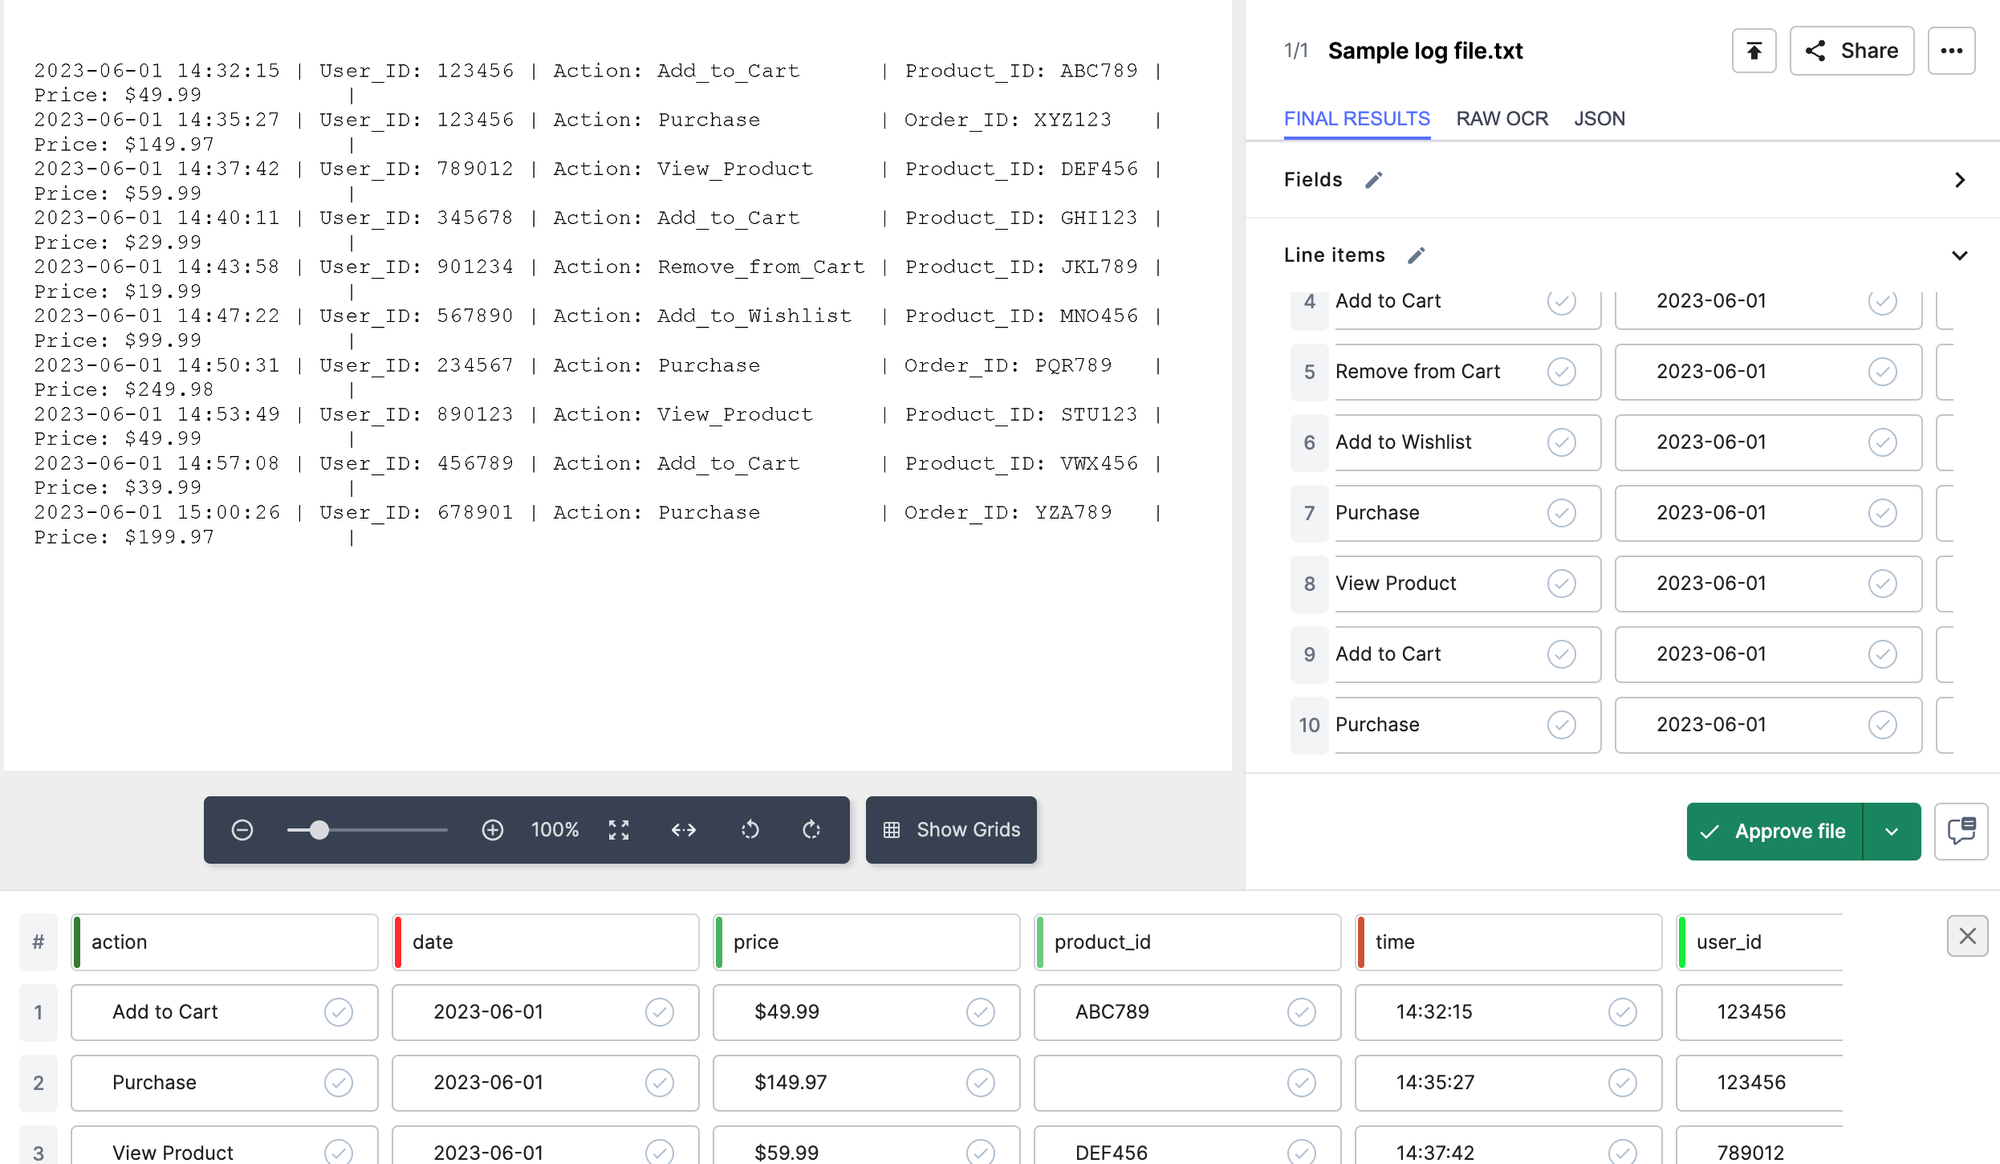
This workflow should help you map fields from the log files to the appropriate columns in your Excel sheet, ensuring a clean and structured output. Also, you’d be able to auto-populate the Excel sheet with new data as more log files are processed, keeping your analysis up-to-date.

IDP tools can handle a wide range of file formats, including text files, images, PDFs, and Excel sheets, and accurately extract structured data from both structured and unstructured documents.
These solutions enable businesses to automate document processing without worrying about clarity of prompts or workflow errors. They also offer features like data validation, error handling, and integration with other business systems, making the entire process more robust and scalable.
Best suited for: Extracting structured data from large volumes of complex, unstructured documents like invoices, receipts, or log files. They ensure high accuracy and consistency in data extraction, making them ideal for automating critical business processes and gaining valuable insights from text data.
Final thoughts
Remember, getting your data into Excel is just the first step. With tools like Nanonets, you can automate the next steps in your data processing workflow, saving time, improving accuracy, and enhancing your overall productivity.
Whether you’re an IT admin, a business owner, or a data analyst, having the right tools and techniques at your disposal can make a significant difference. More than getting your hands on the data, the focus should be on managing, processing, and using that data to drive insights and decisions.

Scale your document data extraction now!
Find out how Nanonets can be customized to your specific document types and data requirements. Schedule a demo to see how you can train custom OCR models and set up workflows that fit your business perfectly.


